What is glass fusing?
There are so many ways in which glass may be manipulated to produce both functional and decorative artworks. One of the most accessible techniques to achieve this is glass fusing. There are many techniques for doing this, and one of the main and easier ways to do this, is with a glass fusing kiln.
Glass fusing is the process of merging two or more pieces of compatible glass into a single piece. This technique differs greatly from other glassworking techniques because glass is manipulated while cold, allowing artists to take their time while they build their creations. Commonly applied towards the manufacturing of jewelry, home goods, and ornaments, glass fusing offers a wide variety of creative options for both the amateur and the experienced glassworker.
One of the distinct characteristics of this technique is that there are degrees to which it may be applied. This means, two pieces of glass may be made just malleable enough to stick together, or they could also be fully integrated into each other. Controlling the temperature at which materials are heated is the key to achieving these varying levels of fusion.
The origins of Glass Fusing
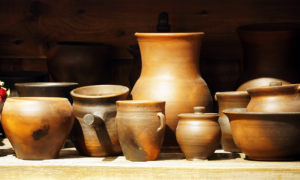
In terms of its origin, glass fusing precedes other glassworking techniques. Being the preferred method for over 2,000 years before the invention of the blowpipe, glass fusing is an accessible and rather simple practice if compared with more modern processes. It is both attributed to ancient Roman and Egyptian civilizations, which used to manufacture beads, bowls, jewelry, and even container-like objects such as jars, bottles, and vases.
As soon as glassblowing was developed, the popularity of glass fusing went down, but a comeback occurred around the 20th century. Nowadays, modern pieces may be found in both artistic and utilitarian settings, showing that ancient manufacturing techniques may remain relevant over time.
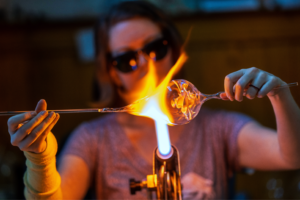
Starting a practice in glass fusing is much easier since it doesn’t require industrial-level equipment. After selecting the correct type of glass and coming up with their design, a set of simple handheld tools and access to a glass kiln consist of all the equipment an artist needs to produce glass-fused pieces. By reducing expenses, this discipline allows beginners to try their hand at a very particular way of bringing their creative ideas to life.
Glass fusing technique
Glass fusing process involves completing several different stages that will ensure the best results. First and foremost, artists must select the proper glass to be fused.
Different types of glass have different coefficients of expansion (COE) which refers to the rate at which the material changes in size as the temperature around it changes. Glass also starts flowing as it melts, and this trait is measured through its viscosity level. To properly fuse two or more pieces of glass, it is extremely important that they are all compatible with each other, which means they share both COE and viscosity levels.
If incompatible types of glass are used during the fusing process, the final product will not have integrity and will likely crack or break easily. Not only do glass pieces need to be compatible, but they need to have fusing properties, this kind of glass is also known as dichroic. Always double-check with the manufacturer so your projects are successful while going through the glass fusing process.
The second stage of the process involves cutting and arranging the different pieces that will make up the final product. The ways in which different colors may be fused vary, so keep that in mind when planning your designs.
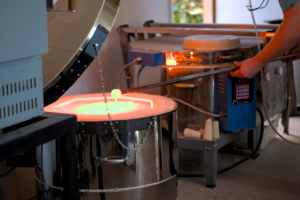
There are many ways to cut, assemble and merge glass that will derive into specific styles, so it is important to be familiar with all the possibilities, so you can let your imagination run free. After scoring and nipping the glass pieces into the desired shapes, put your creation together to make sure every piece is in the right place. After this stage, it is time to start loading the pieces into the kiln.
The final stage is where it all comes together. After loading the kiln, it is important to program it correctly, so you can achieve the desired effect. The will be a specific temperature and firing schedule for each glass fusing design. Finally, before removing your piece from the kiln, be sure that your pieces have cooled off entirely.
Glass fusing designs
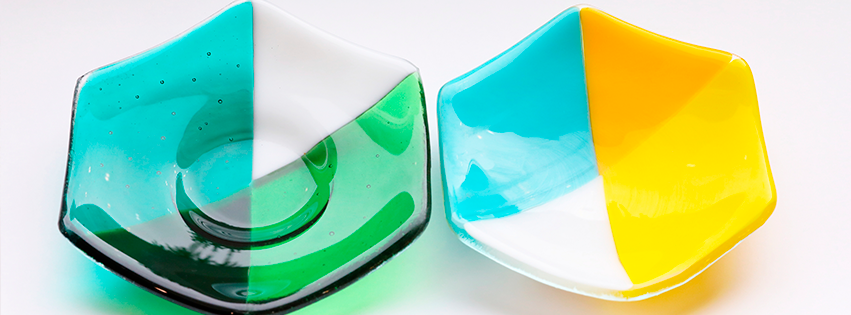
As mentioned before, there are several different designs that glass fusing can achieve. The six most popular are full fused, contour fused, mosaic fused, flow bars, pot melts and screen melts.
Fully fused art pieces have a smooth texture since the glass in them is melted to the point in which all the pieces blend into one. Contour fused pieces are quite the opposite because they intentionally show the texture of each piece involved in the process. When creating with this style of glass fusing, glass is melted only to the point in which it will stick with each other, but it won’t integrate.
Mosaic glass fusing usually creates an image from previously cut pieces of colored glass that are placed on top of another flat piece that will contain the design. All these pieces merge, allowing the flat piece to become the frame or backing of the rest. Flow bars, pot melts and screen melts all refer to a technique where molds are used to draw molten glass through different stencil-like shapes, dripping onto a base and fusing the pattern altogether.
Other techniques involve glass in more unique formats, like powder. One way of applying powdered glass is through the “freeze and fuse” method. This unique way of creating art occurs by first taking wet powder glass and mixing it with water.
It is later packed into a mold, where water is forced to the top. After blotting off the water, the mold is then put into the freezer until the wet powder is frozen solid. The resulting frozen object is popped out onto a kiln shelf and taken to a temperature hot enough to fuse all the powder frit together, forming a solid glass object.
Glass fusing projects
The most popular glass fusing projects include plates, tiles, bowls, jewelry, wall hangings, pendants, ornaments, and sculptures or figurines.
It is possible to be as creative as you want by mixing different fusing techniques, colors and textures. If your project involves a piece that will come in contact with food, it is recommended that the glass used for it is FDA approved to ensure it is safe for human use. All other decorative objects have no restrictions when it comes to the glass they can be made out of, as long as it is of the fusible kind.
For beginners, starting with smaller projects might be a good way to start practicing. Experimenting with the different possibilities and styles of glass fusing in smaller-scale projects may ever serve as a sample set, which can then be referenced for further projects.
Glass fusing is a great way to explore abstract shapes and lines since materials are being handled in both solid and liquid state. All in all, glass fusing is one of the most accessible glassworking techniques, therefore being the perfect introduction for artists and creators who are interested in delving into the world of glass.

Which are the best kilns for glass fusing?
A central part of the practice of glass fusing is the specialized kiln needed to combine glass elements. A kiln is a thermally insulated chamber, a sort of oven, that produces temperatures that can harden, dry, or produce chemical changes within certain materials. While ceramic kilns are the most widely known, glass kilns are made specifically to heat, melt and manipulate glass.
These kilns make sure to keep temperature even prevent cracking within a glass piece or project. There are several things to consider before selecting a kiln for glass fusing purposes. The first one involves its shape, which is usually either oval or rectangular. Glass products fired in a rectangular kiln will normally cool faster than those fired in an oval kiln.
JPSKilns offers small glass fusing kiln models that only emit electric resistance within their interior side panels. The structure of these kilns is composed of a chamber with a floor area, interior walls, and a lid. These elements are all made from high quality materials and are able to be personalized for better compatibility with your projects. All of these models include a digital programmer so that you are in control of the firing process at all times.
Pay clear attention to this when ordering your kiln…
It is also crucial to think about the energy requirements of your kiln. The bigger the kiln, the more energy it will consume, so make sure that the voltage and amperage available in your workspace match that of the kiln selected.
The size of the kiln needed for your projects is going to depend on the type of pieces you’re looking to produce. Beads, jewelry, and other small pieces may be fired in the smallest kiln format, while larger pieces or large commercial production batches may need the largest size available in the market.
It is also possible to fire glass pieces in a ceramic kiln, but close attention needs to be paid to the specific timeframes and temperatures. Assistance from an expert is recommended when first loading and firing any type of kiln for your beginner projects.